Scenic Tour: Shattered Forest – Part I

I have always found forests to be difficult. It’s the density of vegetation, the complicated interplay of light as it passes through branch after branch before striking the leaf-strewn ground. That said, I don’t feel terribly bad about my latest attempt. In fact, I rather like how it turned out.

The Germans have a word, Urwald. In one sense, it simply means jungle. In another, it is a primeval forest. Something twisted and dark. It is the place of fairytales that end in blood and screams, where nightmares hide in shadow and the howling of wind through trees might be more than just that.

I didn’t just want to aspire to that aesthetic, though. My Urwald is stretched over a shattered landscape. The earth has pulled apart, leaving winding chasms between pillars of stone. This area marks the edge. A lonely road through a lonely wood, where travelers dare not wander far off the path.

Forest RoadForest Sweep Forest Ruins Forest River Forest River Sweep Forest Pool Forest Path Forest Falls Forest Dense Forest Creek Forest ClearingExcept another update soon for a trip further into the woods.

Scenic Tour: Clifftop City – Part I

Cities are always tough to bring to life virtually. Anyone who knows and loves a city somewhere in the world knows their city is alive. It ebbs and flows and breathes, and buzzes with a subtle energy in a thousand different ways that makes it unique and makes it home.

I wanted to create a city that demonstrates triumph over its harsh environment and a stubborn refusal to compromise its culture despite its stark circumstance. What I came up with is a bustling, industrious city built on a bluff on a kilometers high cliff. Howling winds and bitter cold tear at the stone buildings and their denizens, but life continues and even thrives.

My city lacks walls, for of what benefit are walls when you’re already perched way up high and out of reach? Traders, visitors, and homecoming citizens alike ascend in massive lifts to reach the city streets. These three shots are rendered in the toolset so they’re not quite as sharp, but it’s the only way to give a proper sense of scale.01ToolsetWide02ToolsetAngledNote how the roads aren’t textured in to the left and the top from overhead. These parts of the area cannot be seen from in game, and merely serve as backdrop. 03ToolsetTopNew arrivals hurry off the lift, their legs wobbling like jelly, and scramble up the cobbled streets awaiting them.05DownstreetThose merchants who can’t afford a license for the market proper set up their stalls wherever they can. The city’s aqueduct escorts a little stream over streets and between buildings, and also serves as a boundary for the city’s less affluent district.04StreetBack at the city’s edge stevedores bustle to unload the lifts carrying goods from the warmer valley below. I really strove to evoke a waterfront feel, sans the water. Wooden wharfs and cranes for loading cargo, and a trebuchet for defense.06Dock07Dock08DockWarehouses close to the city’s edge store an ever changing flow of goods. Crops and perishables arrive from more fertile lands, while the compact and valuable cultural creations of the city wait to be spread into the world.09StreetThose too poor for a home in the city’s slums erect their little lean-tos beneath the meager shelter of the aqueduct. 10AqueductThe sun slowly sets over one of the city’s squares. An ancient oak’s frosty branches sway slowly in the frigid wind.11Sunset12NightThe poor huddle around makeshift fires in their Court of Stars and light candles to honor their absent friends. 13StarsFire14StarsAlley15StarsNarrowOnly the rushing water of the aqueduct breaks the relative silence of night along the city’s edge. 16DockNightThat’s it for now, so thanks for reading. The whole city will be split over three or four areas, so stay tuned for the rest.

Scenic Tour: Tundra

This project is the culmination of a lot of long and hard work, but it has been well worth the effort. I wanted to create a setting that was instantly distinguishable from the usual, at least when it comes to Neverwinter Nights persistent worlds. The vast majority of servers out there feature the Forgotten Realms setting, and seem to be reminiscent either of the deep green hills and forests of western Europe or the arid deserts of Mesopotamia. It was very important to me to create something visually distinct and unique. I want my players to feel they are in a different world the moment they enter it.

I decided to set my server in lands that stretch from arctic in the north through tundra, and then taiga in the south. These images of the Scoresby Sund in Greenland and of autumn on the tundra inspired me to the decision, and I sought to create a bright and colorful environment.Neverwinter Nights 2 lacks the necessary assets to create such seemingly alien landscapes, so I set about designing my own. I initially attempted to emulate the vibrant reds and orange-yellows pictured above, but found myself having difficulties creating cohesive color palettes, so I opted for a softer pink which blends more seamlessly into the other textures.

To create such a bright, vegetation rich environment as those above, I would have needed to pack my areas with grasses and trees to the point that they would be too resource intensive, so it was important that I could apply color in patches alone without looking out of place. I also didn’t want to create an environment that felt too alien to feel like home. I will likely opt for a more accurate recreation of the above scenes in future work when it is more appropriate to my needs.

This overhead shot rendered in the toolset shows off my area as a whole. The cliff and river in the foreground and to the left create natural boundaries, as do the hills in the background the forest to the right. These parts of my area will be expanded to create adjacent zones in my module.OverheadQuaint farmland is nestled against gently rolling hills in this idyllic setting to create a sense of calm and peace. This serves to create a point of contrast for when strife is brought to the region in the course of the module’s storyline. EstablishingWorked by hand, this little farm’s fields are smaller than those we have come to expect today, and work to create a safe, homey atmosphere. FarmA frigid stream runs south from the mountains above, its stony bed kicking a fine mist into the afternoon air.RiverA short distance later, the stream tumbles over the cliff which marks the edge of the zone. Unfortunately, it is best viewed from the adjacent zone to the south which isn’t finished quite yet.FallsA small family operated meadery sits at the base of gently sloping hills. The tasting room is open, and will serve as a resting point for player characters. Beehives dot the hillside in the background.MeaderyAt the southern edge of the area one can peek into the campsite below. The edge of a forest sits atop the cliffs a short distance away.CliffsThe sun casts a fiery light over the tundra as it begins to set, darkening our sheep’s sorrel to an angry red. A windmill continues to creek as it turns. WindmillAs the sun spends a last few minutes above the horizon, it casts long shadows that highlight the rugged topography. SunsetThe odd lantern keeps travelers on the winding road, while firelight flickers in the windows, keeping this farm’s occupants warm. A keen observer might notice a very unfortunate flaw of the engine, in that it doesn’t apply point lights to grass.Night RoadThe bustling life of the meadery has gone still as the bees too rest for the night.Night MeaderyA luminescent moth dances beneath the stars as the moon rises, giant against the wooded horizon in the distance. Moon ForestAs the moon reaches its zenith, it’s gentle light glows against the patches of pink flowers that sweep out across the plain.Moonlight FieldsThat’s it for now, but there should be much more to come in the very near future. Finalizing the unique look of my setting has lent me a renewed sense of purpose, and I’m already well into my next visual spectacle. As ever, thanks for reading.

Scenic Tour: Creepy Emporium

This week’s area was designed to stand in stark contrast to last week’s. While the former hopes to invoke a sense of cozy, comfy warmth in players, this one strives to create a sense of unease. Bright and soft wallpaper is traded for crumbling stone walls, rotted wooden crossbeams, and cobwebs. FloorplanI also wished to draw attention to the unplanned nature of this black market’s establishment. It finds itself in a run-down cellar which distinctly suggests that it was moved into and adapted, rather than built with the final purpose in mind. The mismatched floor and obviously more recently constructed divider walls show the transformation which has occurred.

Find us in the dark and black and descend our ancient stairs. We wait here night and day, to sell our wicked wares.EntranceThe steamy whistle of our oven draws your eye and ear. Pick up a knife or axe, and try it while you’re here!SteamIron bars both cold and black, keep safe what otherwise might just attack.Slave CellsThis azure crystal’s pulsing glow, lights poisons that’ll make your heart beat slow.CrystalSo take your time and have a look. Rest your eyes on a forbidden book. There’s plenty here for you to see. Something I’m sure, to fill your heart with glee.Sweeping View

Scenic Tour: Cozy Shoppe

So it’s been a while, but that shouldn’t be news to anyone who’s been following along. I have been quite busy of late, but fortunately I’ve still had time to get some work done! I’ve just not had a minute to spare to show it off. You can safely expect regular updates for the next few weeks though.

I have slowly but steadily been making area after area, ever building up to a complete.. something. I cannot honestly say I know what will come of it, but I certainly know what I want: a PW of my own. A project I can truly call my own in terms of design and creative control. Something to be proud of. Consider these next few updates a teaser of things to come.

A sturdy city is built into the side of a cliff that rises a kilometer above it, and falls half as far below. Narrow cobblestone streets climb from terrace to terrace, little shops and homes sheltering them from the biting winds. Still, it is a prosperous city, a pinnacle of human engineering and culture. On the corner of a pleasant little square lies a small goods and sundries shop run by a motherly hen of a woman. Come in and step out of the cold!

For this small area I wanted a cute, warm-feeling little shop. A place for players to buy basic equipment and sell their hard earned loot. The shop features a main room with its wares, a small office for the shopkeep, and a fitting room for clothing in the back. The fitting room will serve as a place for players to customize the appearance of their character’s clothing.Floorplan

A small collection of weapons, armors, and shields greets visitors as they first enter this humble boutique, many in the city’s colors of white and light blue. Warm morning sunlight streams through the windows to brighten the room. Entrance

In the next corner over, market goers can find a selection of veggies, meats, and cheeses to sate their appetites, along with the wares needed to cook them. Sunlight shines through a few potions for a shining, glittery display. Most of the produce you see on the shelf in the back was placed piece by piece. I promise you it took a while.Produce

A wide counter facilitates hasty transactions. Copper, silver, and gold are measured before being hidden away in one chest or another. A battered iron wood stove staves off the crisp winter air. Checkout

A selection of bright cloth boldly proclaims “Yes! You too can twirl and dance on the floors of fine ballrooms with the nobility.” Most of those are actually bedrolls, but a splash of color and a little imagination goes a long way. Cloth

A fitting room in the corner grants a little privacy, while three mirrors promise you those new clothes look simply divine! Fitting RoomA neat and cozy office gives the shopkeep a few moments relief from her hectic business to work or for a quiet conversation. Take a look at the open and closed curtains. The open one is really two scrunched versions of the closed, with a modified spear for the curtain rod!Office Window

Here’s a final shot of the office: a few comfy seats and a bookshelf.Office Seats

I paid particular attention to color with this project, with soft red, blue, and yellow making up most of the decor. Each room has a primary color, with decorations of the other two mixed in. All in all, this was a relatively high-detail build. Let it serve to demonstrate how even a few small rooms can be packed with interesting eye-candy.


Scenic Tour: Flatholm

I had an incredible amount of fun on this particular project. I had so much fun, in fact, that I thought to mention if very first in this post. With that out of the way, I’ll get right into the meat of it.

This was an area I designed and developed as a favor to a friend for Legacy: Dark Age of Britain. Those in the community might know deMoin, an excellent storyteller and role-player. Those who have not yet had the pleasure are truly missing out.

The project: to design a small island for use as a home base by one of Legacy’s up and coming player factions. This small island located in the Severn Sea was to be loosely based Flatholm. I was told to make it the absolute most miserable place imaginable, and I like to think that I succeed. I will mention that I purposefully didn’t look at any pictures of the actual island until after I had completed the project. That said, have a look!

Welcome to Flatholm…DockYou’ll like you stay.StairsWe hope you’ll hang ’round a while.BridgeEnjoy the comforts of our inn, on such a lovely day.InnYou can avoid a quick short drop, if you’ve sufficient guile.PatioOr if it’s work you seek, we’ll house you free of charge!CagesOur blacksmith’s steel is nigh unyielding, by and large.SmithOr have you silver? Why not stay? Our homes keep out the cold and wet.HousesPay our lord homage, in his keep,KeepOr suffer and regret!Keep Base

Scenic Tour: Snowy Pass

Today’s update is going to be a short one. Over the weekend I threw together a quick tutorial on making rivers using the WaterMill plugin. As a consequence of this, I also produced a small area, and it turned out nice enough to warrant its own brief tour.

The area is a snowy mountain pass with a road following a rapidly flowing stream as it winds along a cliff, eventually turning and carving into it. Rolling snow-covered hills dotted with tough little trees and a small valley comprise the rest of the area. This view is taken from within the toolset, and has the fog disabled so you can better take in the area as a whole.River9

Here is a much closer view of the creek as it begins to carve into the hillside, leaving shear walls of weathered limestone in its wake. Solid chunks of ice partially block the river and form small rapids, and also conveniently help hide a glitch in the water surface caused by a megatile border.
Snow CliffA small camp sits at the edge of the cliff, the merchant wagon already beginning to sink into the ever-rising snows. A cute campfire provides much needed warmth to weary travelers, and a leanto some shelter against the biting winds.Snow CampLooking north along the cliffs you’ll see a waterfall. The horizon quickly fades to a dull white in the heavy snow. If you look closely, you can see a raven perched on the road marker to the top right.Snow FallsAn even smaller creek tumbles down the hillside and joins our steam. Placed effects and environmental objects liberally applied serve to hide the abrupt change in flow direction. Snow CreekFinally, a picturesque view of gently rolling hills to the northwest. Here and there tufts of grass struggle to survive amidst the squat evergreens. Snow HillsAll in all, I had quite a lot of fun with this project. This was my first time working with snow, and I found it delightful. It was surprisingly easy to make the snow look good, as uniformity in ground texture is a lot harder to notice. I definitely hope to have the opportunity to create something more substantial in an arctic setting. Limited assets do tend to limit options, but hopefully creativity will prevail.

Until next time, peace!

Technical Technique: Rivers on an Incline

For today’s update I thought I’d write a little tutorial on creating sloped water surfaces in the Electron toolset. The basic tools provided allow for one flat elevation of water per megatile (4×4 tile). You can have different elevations of water, but can only change elevation at tile boundaries, and you couldn’t have water on an incline. Neverwinter Nights 2 can handle inclined water, however. It just doesn’t come with the tools to do it by default.

Basically, NWN2 stores the water plane in exactly the same format as it stores terrain. The toolset cannot edit the water surface to the same degree, so what we’re going to do is shape the terrain to match what we’d like the water surface to look like, and copy those values over. Afterwards, we’ll change the shape of the terrain so that it doesn’t perfectly coincide with our water.

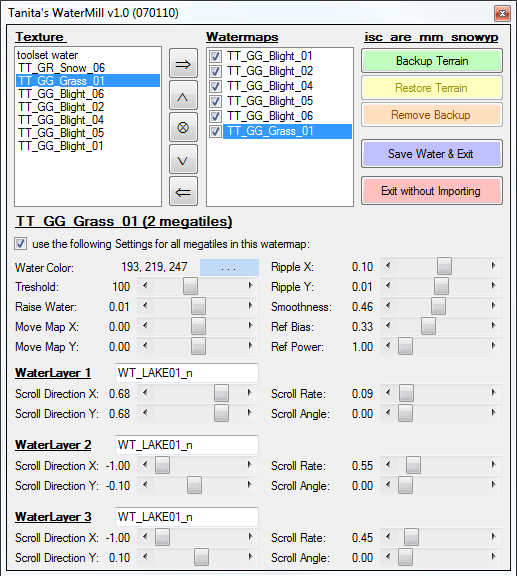
For this tutorial I will be using Tanita’s Watermill, a wonderful little plugin for the NWN2 toolset. The included read-me does a nice job of explaining how to set up the plugin, and even gives a nice explanation of how water and terrain work in the Electron engine. Much of what I’m going to cover here is also covered there, but I prefer to demonstrate with a practical example, and not just screw around in the toolset for a bit.

We start with our exterior area. I’ve gone ahead and filled it with a snowy texture for the hell of it, but you can use whatever you want at this point. The Watermill plugin uses textures to denote the areas of terrain we want to match our water to, so there’s no point texturing anything quite yet, as we’ll just have to redo it later.River1
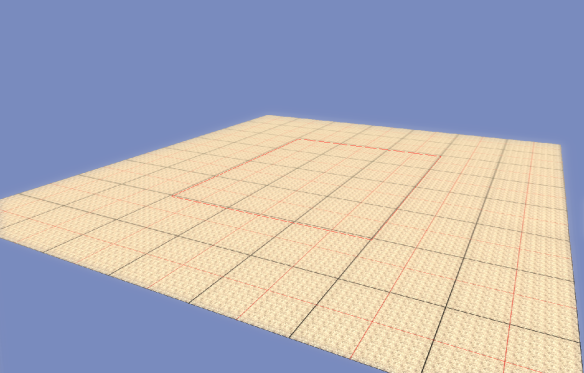
Here, I’ve gone ahead and given basic shape to the area. My plan is to have a steep, rapidly flowing creek join a winding stream which follows a cliff side. Using a texture at 100% pressure with the outer portion of the brush set to 0, I’ve painted the path of both the stream and the creek. I chose one of the blight textures as they stand out, and I’m not planning on actually using them for the area.River2
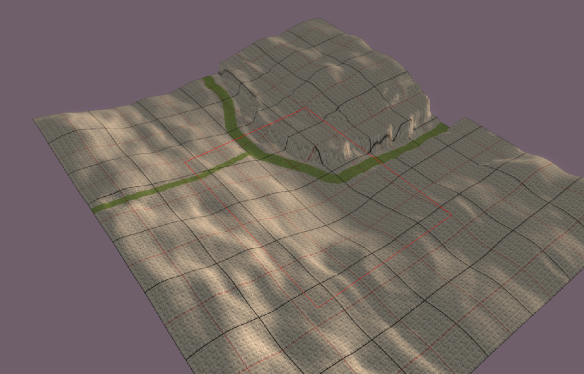
If you look carefully, you’ll note that each major curve in the stream takes places along one of the thick black lines, the borders to the megatiles. I’ve done this because while the game will support multiple elevations within one megatile, it doesn’t support different ripple patterns, which we’ll use to determine the direction the water appears to flow.

Using the Select Terrain mode, I’ve replaced our original blight texture with a different texture in each megatile, such that each texture outlines water that will be flowing in a specific direction. You’ll note that these areas don’t have to be contiguous, as shown with the two separate parallel patches of the sea foam green texture..River3

Next, I’ve fired up the WaterMill plugin and selected one of our blight textures. Pressing the right facing arrow creates a watermap perfectly contiguous with our texture. I’ve set the ripple flow rate and direction below such that this portion of the stream flows directly east. River4After saving our watermap and exiting, you can see that water has appeared over our blight texture. At this point in time, the water surface and the terrain surface lie perfectly on top of each other, which can create some nasty clipping issues. Later on we’ll lower the terrain to create a riverbed in the center, and raise it to create shores at the edge. River5I went back to the plugin and set separate flow rates and directions for the remaining textures. Just as textures are stretched and skewed over steep terrain, the water’s ripple effects appear to be accelerated down steep slopes. Nevertheless, I’ve given the creek a slightly faster flow rate than the stream.

It’s important to note that once you’ve converted a texture into a watermap, that watermap is saved regardless of what you do to the terrain or texture back in the toolset. This allows us to use textures to delineate our water, then scrap them and make the map look pretty and setting appropriate afterwards. River6The completed stream complex is nearly done, save for the rather hideous shades of green marking the riverbed. River7
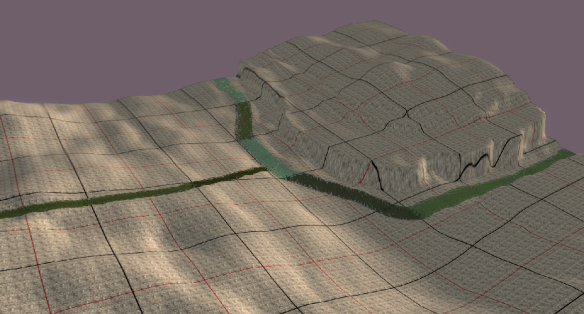
I’ve gone ahead and tiled the whole map with our snow texture again to remove the ugly green. Our watermaps are still saved in case we accidentally mess up, and we can always restore the water to this exact state by reopening the plugin and exporting the watermaps again.

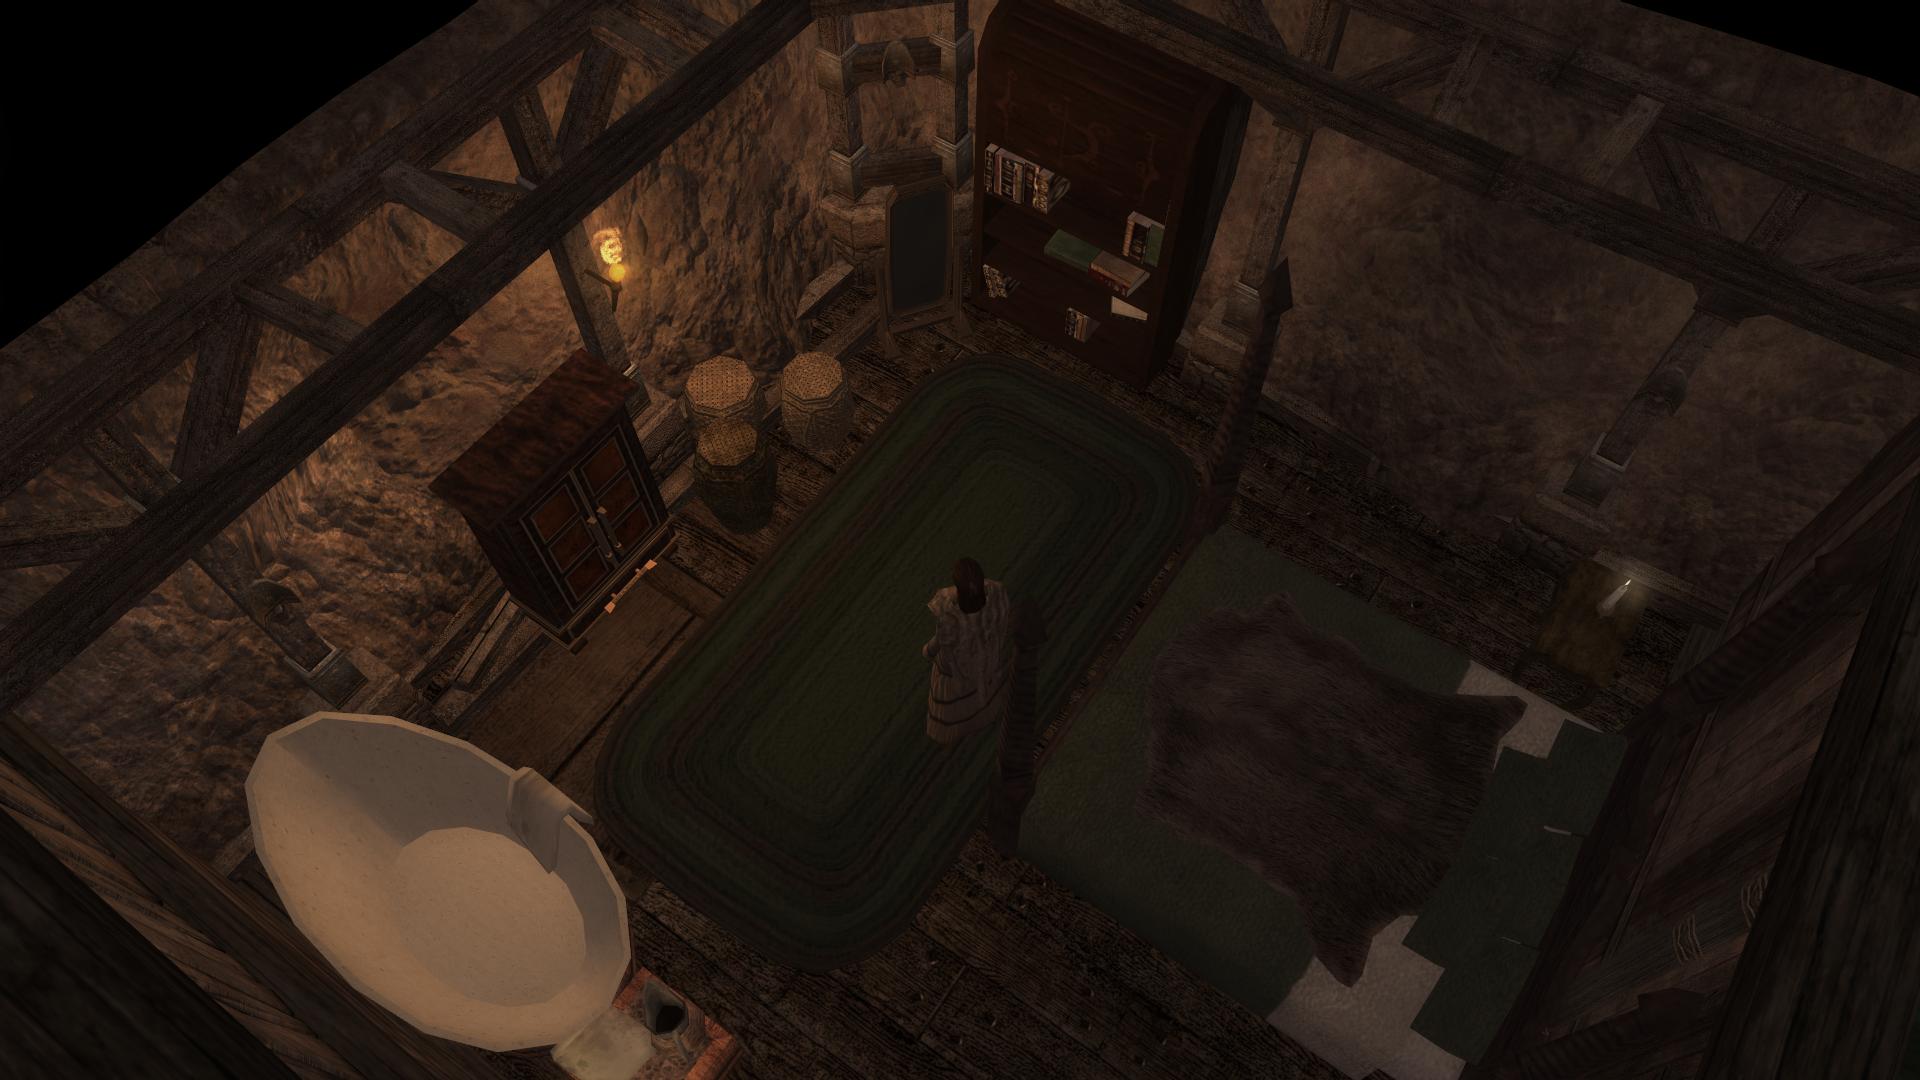
Generally it’s a good idea to paint wider paths for your rivers than you want to end up with. You’ll end up narrowing the stream when you raise the terrain at the edges to create a riverbank. River8With the water set, it’s time to turn the rest of the area into a picturesque winter scene. I’ve retextured most of the map, added placeables and some snow effects, and generally tidied things up. If you look to the top left, you’ll see that I’ve made the area slightly longer. Since it would have been nearly impossible to realign the terrain with the existing portion of the stream and seamlessly continue the water surface, I went ahead and made it a small waterfall to hide the break.River9
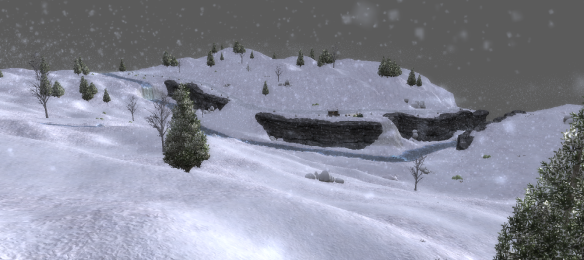
I hope this tutorial was helpful and will encourage others to play around with pushing the toolset to its limits. Adding inclined water to your areas is a good way to set yourself apart from a lot of builders who simply don’t bother to go the extra mile, and it really gives you a lot more freedom when it comes to designing bodies of water. I hope you give it a shot, and I wish you good luck out there!

Scenic Tour: Mountain Home

This area remains a favorite of mine, but I’ve held off on writing about it because it’s hard to capture all of its essence in a few screenshots. Basically, it is a mine complex that has been prettied up and turned into a Lady’s feast hall and living space. Unfortunately this area doesn’t have a home yet, as the server it was designed for no longer had need of it as its story advanced. The whole place burned down.

This is the centerpiece of the area: The feast hall. Two long communal tables run the length of the hall, with a table on a raised platform at the end for the nobility. At the other end of the hall, a freestanding fireplace burns amid seating areas. These two shots capture the juxtaposition of mineshaft and rustic architecture, which was a really fun combination to play with.Feast Hall 1Feast Hall 2An armory sits at the end of a winding mine shaft. Shields, armors, weapons, and equipment line the walls. Practice dummies and an alarm gong sit in one corner, while a few cells for prisoners of value occupy the other.ArmoryA barracks for the house guard is crammed into another shaft. Beds, chests, tables and cabinets are set against the bare stone walls.BarracksThe bath chamber is home to two massive baths, separated from each other by low walls. Candles offer the chamber a relaxing atmosphere. BathTwo small rooms are set into the wall off of the feast hall. The first is an alchemist’s laboratory. Just across is a small library. If you look at the second picture of the feast hall, you can actually see where the wooden wall is lower and lined with decorative vases. That opening leads directly to the laboratory.LabLibraryThe complex’s crowded and busy kitchen has a floor of packed dirt. Shelves laden with ingredients and utensils line the walls and an oven bulges from a corner. KitchenThe master bedroom is the largest and most lavish of the four bed chambers in the complex, and is the only one depicted. Bedroom 1When the mountain home comes under attack, the lady of the house can make her escape through the passage concealed behind one of the room’s bookshelves. Bedroom 2


Scenic Tour: The Sultry Siren

Nestled into a narrow valley of a jungle island lies a battered and weathered inn, a business of questionable repute and a common haunt for adventurers. The Sultry Siren is inn, bordello, bare-knuckle boxing joint, and anything else its customers can afford to pay for.

When I started this project, it was half a year after making the jungle landing area described in Monday’s post. You can see the inn from the outside if you like, and I recommend it! The Electron toolset handles interiors as tiles. Each tile consists of a room or a part of a larger room, and comes with pre-configured walls, windows, floors, and doors. In many cases this limits the internal architecture of buildings to a rigid, square grid. Furthermore, interiors for buildings in Neverwinter Nights 2 are often considerably larger than the building exterior, since it’s quite difficult to cram anything into such a small space with such unwieldy tools.

The challenge I set myself with this area was to make the inside resemble the outside as much as possible when it comes to layout. The TARDIS effect is cool and all, but it doesn’t have a place in the dark ages. About half of the visible walls in this area are parts of tiles, and the rest are assembled piece by piece with placeable assets. You can tell the difference if you look closely, but I think that inconsistency is appropriate for a building that’s likely been repaired time and time again with whatever material was at hand.

With that out of the way, I’ll hop straight in. Right through the front door stands an impressive open fireplace. A concierge desk sits against the wall, with ledgers and lock-boxes waiting to accommodate the inn’s patrons. ConciergeThe inn’s small tavern consists of a bar, a communal table, and a few booths for those in want of a (slightly more) private conversation. TavernDown a narrow hallway to the side lies an open room ideal for dancing and large gatherings. A small stage is crammed into the corner, occupied equally often by musicians and less than fully clothed women. HallThe cramped back room doubles as a kitchen and a gambling house, with a large card table occupying much of the floor. Card RoomThe narrow spaces either side of a downward staircase serve as storage for ales, wines, and cooking supplies. Fun fact: This is the only staircase in this area that came as part of a tile. While the toolset lets you assemble stairs, it doesn’t let you cut holes into the floor, so I had to make do with one of the default options.StorageThe basement is a cavernous chamber hollowed directly into the bedrock. Frequent drips of water have cultivated a number of molds and mushrooms on the earthen floor. A makeshift ring is used for bare-knuckle boxing matches, on which the inn’s patrons undoubtedly wager. Cellar 1The cellar can be accessed from within the Sultry Siren, but also from just outside. Both of these staircases aren’t part of any tile, and were constructed out of component parts for a personalized touch.Cellar 2Tucked into a corner back on the ground floor is a small sitting area and library. The inn’s meager collection of books struggles to fill a few rickety old bookshelves while a warm fire and comfortable couch add to the room’s cozy atmosphere. Stairs in the corner lead to the inn’s many bedrooms.Sitting RoomAcross from the landing on the upper floor is a small common room furnished with a few sofas and tables. A narrow, claustrophobic hallway serves as a testament to the need for efficient use of space. Common RoomPatrons have a number of sleeping arrangements available to them, ranging in size and number of beds. Most rooms have a desk or table and a bath, as well as a few artful decorations. If you haven’t noticed it yet, the inn’s favorite color is blue. In fact, the only objects to be any other color are the red booth seats, which couldn’t be altered in the toolset. Room 1 Room 2 Room 3Finally, for those more technically minded, I’ve included three overhead shots from the toolset that depict the floor-plan of each level. The grid of tiles can easily been distinguished by the creamy color along the top of certain walls, which contrasts greatly with the many other walls that form little nooks and crannies and other architectural oddities.

I hope you’ve enjoyed this little tour. Interiors are a different animal than the irregular landscapes I’ve been showing off. Focus is drawn to the little details that bring a room from feeling spartan to cozy and lived-in. Unfortunately, it isn’t quite as easy to find picturesque angles that also show you a good amount of a room’s contents, but as ever, I will continue to do my best.

Until next time, peace!